


If you’re using Vue framework, you probably already know what Vue CLI is. It’s a full system for rapid Vue.js development, providing project scaffolding and prototyping.
An important part of the CLI are cli-plugins. They can modify the internal webpack configuration and inject commands to the vue-cli-service. A great example is a @vue/cli-plugin-typescript: when you invoke it, it adds a tsconfig.json to your project and changes App.vue to have types, so you don't need to do it manually.
Plugins are very useful and there are a lot of them today for different cases?—?GraphQL + Apollo support, Electron builder, adding UI libraries such as Vuetify or ElementUI… But what if you want to have a plugin for some specific library and it doesn’t exist? Well, it was my case ????… and I decided to build it myself.
In this article we will be building a vue-cli-plugin-rx. It allows us to add a vue-rx library to our project and get RxJS support in our Vue application.
Vue-cli plugin structure
First of all, what is a CLI plugin? It’s just an npm package with a certain structure. Regarding docs, it must have a service plugin as its main export and can have additional features such as a generator and a prompts file.
For now it’s absolutely unclear what is a service plugin or generator, but no worries?—?it will be explained later!
Of course, like any npm package, CLI plugin must have a package.json in its root folder and it would be nice to have a README.md with some description.
So, let’s start with the following structure:
README.md
index.js # service plugin
package.json
Now let’s have a look at optional part. A generator can inject additional dependencies or fields into package.json and add files to the project. Do we need it? Definitely, we want to add rxjs and vue-rx as our dependencies! More to say, we want to create some example component if user wants to add it during plugin installation. So, we need to add either generator.js or generator/index.js. I prefer the second way. Now the structure looks like this:
README.md
index.js # service plugin
generator
index.js # generator
package.json
One more thing to add is a prompts file: I wanted my plugin to ask if user wants to have an example component or not. We will need a prompts.jsfile in root folder to have this behavior. So, a structure for now looks the following way:
README.md
index.js # service plugin
generator
index.js # generator
prompts.js # prompts file
package.json
Service plugin
A service plugin should export a function which receives two arguments: a PluginAPI instance and an object containing project local options. It can extend/modify the internal webpack config for different environments and inject additional commands to vue-cli-service. Let's think about it for a minute: do we want to change webpack config somehow or create an additional npm task? The answer is NO, we want just to add some dependencies and example component if necessary. So all we need to change in index.js is:
module.exports = (api, opts) => {}
If your plugin requires changing webpack config, please read this section in official Vue CLI docs.
Uploading files with ReactJS and NodeJS
Adding dependencies via generator
As mentioned above, CLI plugin generator helps us to add dependencies and to change project files. So, first step we need is to make our plugin adding two dependencies: rxjs and vue-rx:
module.exports = (api, options, rootOptions) => {
  api.extendPackage({
    dependencies: {
      'rxjs': '^6.3.3',
      'vue-rx': '^6.0.1',
    },
  });
}
A generator should export a function which receives three arguments: a GeneratorAPI instance, generator options and?—?if user creates a project using certain preset?—?the entire preset will be passed as a third argument.
api.extendPackage method extends the package.json of the project. Nested fields are deep-merged unless you pass { merge: false } as a parameter. In our case we're adding two dependencies to dependenciessection.
Now we need to change a main.js file. In order to make RxJS work inside Vue components, we need to import a VueRx and call Vue.use(VueRx)
First, let’s create a string we want to add to the main file:
let rxLines = `\nimport VueRx from 'vue-rx';\n\nVue.use(VueRx);`;
Now we’re going to use api.onCreateComplete hook. It is called when the files have been written to disk.
api.onCreateComplete(() => {
    // inject to main.js
    const fs = require('fs');
    const ext = api.hasPlugin('typescript') ? 'ts' : 'js';
    const mainPath = api.resolve(`./src/main.${ext}`);
};
Here we’re looking for the main file: if it’s a TypeScript project, it will be a main.ts, otherwise it will be a main.js file. fs here is a File System.
Now let’s change file content
api.onCreateComplete(() => {
    // inject to main.js
    const fs = require('fs');
    const ext = api.hasPlugin('typescript') ? 'ts' : 'js';
    const mainPath = api.resolve(`./src/main.${ext}`);

// get content
    let contentMain = fs.readFileSync(mainPath, { encoding: 'utf-8' });
    const lines = contentMain.split(/\r?\n/g).reverse();

// inject import
    const lastImportIndex = lines.findIndex(line => line.match(/^import/));
    lines[lastImportIndex] += rxLines;

// modify app
    contentMain = lines.reverse().join('\n');
    fs.writeFileSync(mainPath, contentMain, { encoding: 'utf-8' });
  });
};
What is happening here? We’re reading the content of the main file, breaking it into lines and reverting their order. Then, we search the first line with an import statement (it will be the last one after the second reverting) and add our rxLines there. After this, we reverse the array of lines and save the file.
Uploading files with ReactJS and NodeJS
Testing cli-plugin locally
Let’s add some information about our plugin in package.json and try to install it locally to test. The most important information usually is a plugin name and a version (these fields will be required when publishing the plugin to npm), but feel free to add more info! The full list of package.jsonfields could be found here. Below is my file:
{
  "name": "vue-cli-plugin-rx",
  "version": "0.1.5",
  "description": "Vue-cli 3 plugin for adding RxJS support to project using vue-rx",
  "main": "index.js",
  "repository": {
    "type": "git",
    "url": "git+https://github.com/glokesh94/vue-cli-plugin-rx.git"
  },
  "keywords": [
    "vue",
    "vue-cli",
    "rxjs",
    "vue-rx"
  ],
  "author": "Lokesh Gupta <glokesh94@gmail.com>",
  "license": "MIT",
  "homepage": "https://github.com/glokesh94/vue-cli-plugin-rx#readme"
}
Now it’s time to check how our plugin works! To do so, let’s create a simple vue-cli-powered project:
vue create test-app
Go to the project folder and install our newly created plugin:
cd test-app
npm install --save-dev file:/full/path/to/your/plugin
After plugin is installed, you need to invoke it:
vue invoke vue-cli-plugin-rx
Now, if you try to check the main.js file, you can see it's changed:
import Vue from 'vue'
import App from './App.vue'
import VueRx from 'vue-rx';

Vue.use(VueRx);
Also, you can find your plugin in devDependencies section of your test app package.json.
Creating a new component with generator
Great, a plugin works! It’s time to extend its functionality a bit and make it able to create an example component. Generator API uses a render method for this purpose.
What you pick in 2018 : ReactJS vs AngularJS vs VueJS
First, let’s create this example component. It should be a .vue file located in project src/components folder. Create a template folder inside the generator one and then mimic this whole structure inside of it:
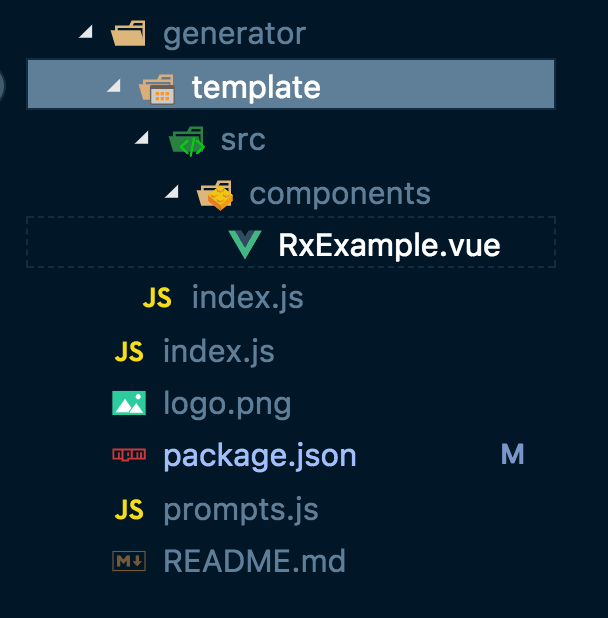
Your example component should be…well, just a Vue single-file component! I won’t dive into RxJS explanations in this article, but I created a simple RxJS-powered click counter with 2 buttons:

Now we need to instruct our plugin to render this component on invoke. To do so, let’s add this code to generator/index.js:
api.render('./template', {
  ...options,
});
This will render the whole template folder. Now, when plugin is invoked, a new RxExample.vue will be added to src/components folder.
I decided not to overwrite an App.vue and let users add an example component on their own. However, you can replace parts of existing files, see examples in docs
Handling user choices with prompts
What if user doesn’t want to have an example component? Wouldn’t it be wise to let users decide on this during plugin installation process? That’s why prompts exist!
Previously we’ve created prompts.js file in the plugin root folder. This file should contain an array of questions: every question is an object with certain set of fields such as name, message, choices, type etc.
What you pick in 2018 : ReactJS vs AngularJS vs VueJS
Name is important: we will use it later in generator to create a condition for rendering an example component!
Prompt can have different types but the most widely used in CLI are checkboxand confirm. We will use the latter to create a question with yes/no answer.
So, let’s add our prompt code to prompts.js!
module.exports = [
  {
    name: `addExample`,
    type: 'confirm',
    message: 'Add example component to components folder?',
    default: false,
  },
];
We have an addExample prompt which will ask user if he/she would like to add a component to components folder. Default answer is No.
Let’s go back to the generator file and do some fixes. Replace out api.rendercall with
if (options.addExample) {
    api.render('./template', {
      ...options,
    });
}
We’re checking if addExample has a positive answer and, if so, the component will be rendered.