
Regardless of whether you're new to OS X or quite a while Mac veteran, it very well may be hard to comprehend the Mac's screen capture usefulness. Luckily, making sense of how to utilize these successful apparatuses isn't as troublesome as you would might suspect – read on for additional on the most proficient method to take screen captures on Mac OS X.
One of the most impressive – and shockingly, obscure – instruments for computerized correspondence is the screen capture. Regardless of whether you're utilizing a PC's Prt Scrn (print screen) button, the iPhone's Home+Power button blend, or OS X's own arcane console orders, realizing how to take a screen capture can make sharing a wide range of substance, or in any event, getting some snappy and impact technical support, simpler than any time in recent memory.
What is a screenshot, and why would I want to take one?
A screen capture resembles a depiction of your telephone or PC's screen – whatever it's appearing at the time you take the screen capture. If you somehow managed to take a screen capture at the present time, it would create an image of you see – for this situation, a program telling a blog entry about the best way to take screenshots,
These pictures can be very valuable, in manners you probably won't consider. In case you're taking a shot at a venture, and simply need speedy input, taking a screen capture and sending it to a companion or collaborator can net you straightforward outcomes without the rigamarole of sparing a huge task document, figuring out how to share it, and trusting that the other individual has the correct programming for opening the record you send.
Furthermore, in case you're needing some snappy technical support, taking a screen capture can be a quick method of disclosing to another person what your concern is – and it works whether you comprehend the blunder or not, which is the thing that makes it such a significant device.
Your Mac really has a great deal of fascinating devices accessible to take screen captures, all implicit to OS X. We're going to begin with the least complex approach to catch what's on your screen.
How to take a screenshot of your Mac’s screen:
Screen captures on OS XThe most essential approach to catch the picture of something on your screen is to just snap a photo of the whole screen without a moment's delay. It feels like a confounded order, however you simply need to squeeze three fastens simultaneously:
Control + Command + Shift + 4
In the event that you have your volume turned up, you'll hear a tick sound – that is the sound that your Mac makes when you take any sort of screen capture. In case you're accustomed to taking a screen capture on a Windows-based PC, you may think you presently need to glue your screen capture somewhere, however you really don't – the second OS X takes a screen capture, it's naturally spared to your work area.
In the event that you limit the entirety of your windows, or utilize the multitouch swipe motion to show your work area, you should see a symbol titled something like this:
.jpg)
The date and time will be whatever date and time it is the point at which you catch the screen capture. On the off chance that you need to rename this picture, click on it and hit the enter or profit key for your console; at that point simply type anything you desire to call the screen capture, and hit your enter key once more. From here you can spare it, email it or offer it to whomever you may wish (avoid ahead to the end in the event that you need to realize how to impart to Dropbox consequently).
Right, OK, however imagine a scenario where you need to just share a particular segment of your screen, similar to a side of the work area, or perhaps only a little piece of a site page. That is alright, we have you secured.
How to take a screenshot of a selected area of your OS X screen:
In the event that you recall how to take a screen capture of your Mac's presentation (and you should, since we simply secured it! be that as it may, in the event that you've overlooked, look up and look again; I'll be holding up here when you've completed), at that point taking a screen capture of only a bit of your Mac's screen ought to appear to be quite natural.
You'll have to press these three catches (note the distinctive number that gets squeezed):
Command + Shift + 4
In contrast to the last strategy, which took the screen capture when squeezed those keys, you won't hear a sound right now. Rather, you'll see your cursor supplanted with a symbol and a lot of numbers. Generally, the numbers are immaterial – they just show where on your screen you are (consider them facilitates on a guide).
Move your new cursor to the region you wish to catch. Snap and drag – don't relinquish your mouse or trackpad button – and you'll see a dim, translucent square shape show up on your showcase. Whatever is underneath that dim square shape is the thing that you'll catch in your screen capture.
When you've moved the square shape to cover the zone you need, simply let go of your mouse or trackpad button. Presently you'll hear the natural screen capture snap, and you'll see another picture record show up on your work area. This time when you open it, nonetheless, you'll notice that it's only a little piece of your screen, rather than entire situation.
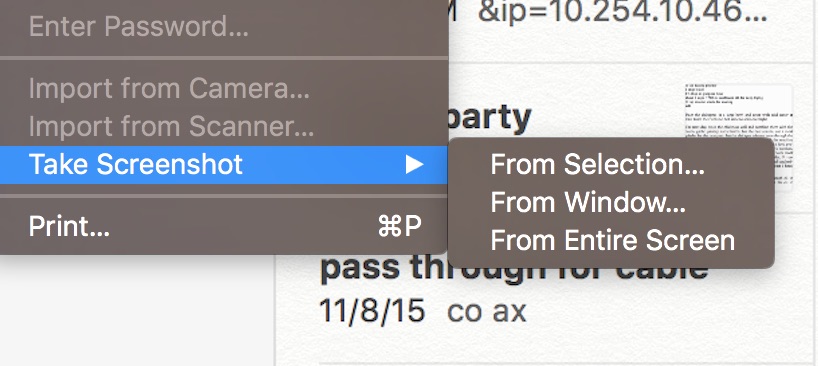
How to take a screenshot of a single app on your Mac’s screen:
Here and there you need to catch everything that a particular application is appearing – perhaps an internet browser, organization apparatus, or something different totally. You don't have to catch the whole screen, yet you likewise would prefer not to need to draw around the application like we represented in the last segment – in the event that you need to take mutiple or two, doing it by hand will get old, quick.
This order will look natural, since it's a similar one you use to catch a particular area of the screen! Simultaneously, hit these three keys:
Command + Shift + 4
Like previously, you're not exactly wrapped up. Rather than drawing around, hit the Space bar. You'll see your application turn a fluffy green shading. Move your cursor over top of whichever application you wish to catch: as you move from application to application, you'll see the fluffy green overlay chase after you.
When you have the application you need to catch chose, basically snap, and you'll have that window spared legitimately to your work area, as with prior orders.
How to save a screenshot to your OS X clipboard, not desktop:
Now and then, you'll need to spare a screen capture straightforwardly to your Mac's clipboard as opposed to sparing it to the work area. You may run into this circumstance when you're gluing pictures straightforwardly into a program or record.
The orders are nearly equivalent to the ones we've recently talked about, with one small expansion: hit Command nearby the various keys.
So in the event that you need to spare your whole work area to the clipboard, it's
Control + Command + Shift + 3
In the event that you need to spare only a part of your screen to the Mac clipboard, it's
Control + Command + Shift + 4
after which you attract the square shape to cover the part you wish to catch.
At last, in the event that you need to send a screen capture of a solitary explicit application directly to your clipboard, hit
Control + Command + Shift + 4
followed by Space, at that point mouse over to the application you wish to catch and snap on it.
How to save your screenshots as jpegs, or JPGs:
As a matter of course, OS X spares any screen captures you take as a .PNG document. It's an organization that organizes picture quality over record size, which implies that a high goals screen capture may bring about a bigger picture than you need. At times, you'll need a JPEG or JPG rather – it'll give you an a lot littler picture that frequently works preferable with sites or devices over PNG does.
Like with taking a screen capture, notwithstanding, your Mac gives the instruments to do this inside the OS itself.
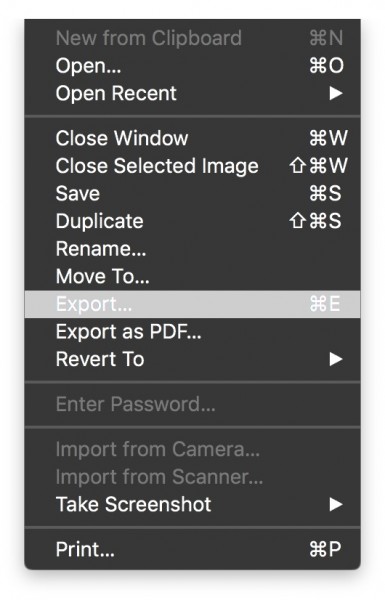
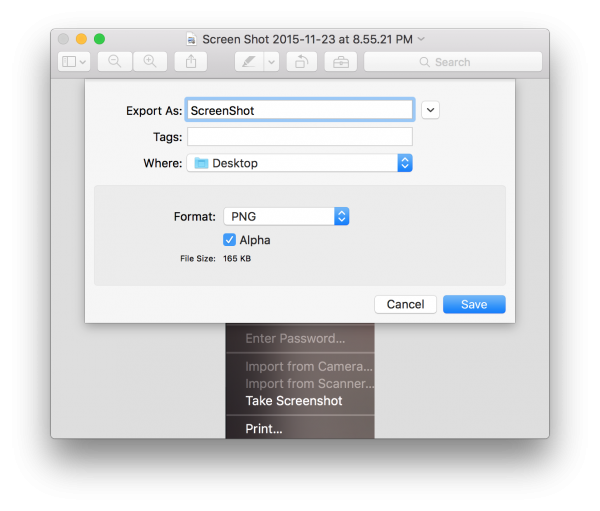
Find where you spared your screen capture (it's most likely spared straightforwardly to your work area), and double tap it to open it in OS X's Preview application. You'll see your picture show up within a window.
From here, mouse up to the title bar at the highest point of the screen. Snap on File, and in that dropdown menu, click on Export. Another window will show up on top. Discover the case close to Format: and snap on it; you'll see a lot of various choices. Select the one that says JPEG, which ought to be at the highest point of the menu.
A slider will create the impression that lets you conclude whether to organize picture quality or document size – in the event that you slide to one side, or Least, your picture will occupy next to no room, however probably won't look generally excellent. On the off chance that you slide to one side, or Best, your picture will occupy somewhat more room, however show up almost undefined from the first.
Of course, OS X chooses a decent medium some place in the center.
How to save your screenshots to Dropbox and share them:
In the event that you need to spare your screen captures to Dropbox, you don't need to bumble with hauling them around or utilizing your internet browser. Rather, you can utilize the authority Dropbox for Mac application to do it consequently. 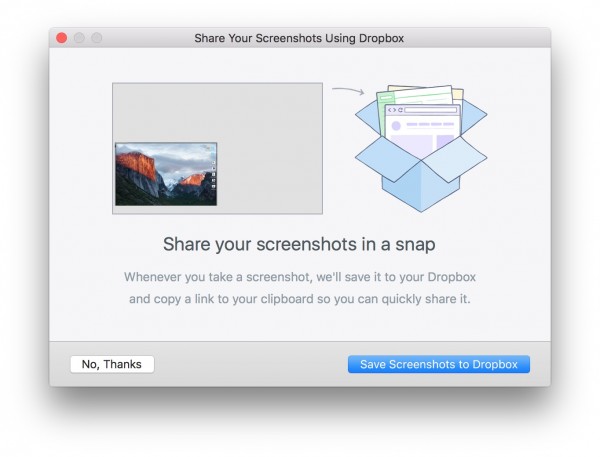
Navigate to https://www.dropbox.com/introduce in whatever internet browser you like. Introduce the application that they give you, and sign in. As a matter of course, the Dropbox application will give you the choice to spare your screen captures to Dropbox naturally – you should simply concur when it asks you.
On the off chance that you've introduced Dropbox quite a while prior and need to empower this screen capture sharing, just open up the Preferences window of your Dropbox application and ensure the transfer screen captures alternative is checked.
Presently, at whatever point you take any sort of screen capture, it'll get spared to your work area for only a second or thereabouts, and Dropbox moves it to your Dropbox envelope, transfers it, and puts the connection legitimately into your clipboard.
That implies that you can take a screen capture and in a split second glue a connect to it into any email or informing application. On the off chance that you need to utilize the first screen capture picture for something, you can discover it within a Screenshots organizer inside the Dropbox envelope saved money on your Mac.