

Did you just get a cutting-edge MacBook? Whether it’s a MacBook Air, MacBook Pro or the brand new MacBook Apple revived in early 2015 with the brand new keyboard era and a Retina show, there are some steps users must take to get the maximum out in their computer.
We’ll show you what happens the primary time you begin the MacBook after which come up with some recommendations for what settings to change, a way to get updates and a few accessories to install.
Before going too a ways, sign up for an Apple account. People who already own an iPhone, iPad or iPod Touch have an Apple account. If no longer, create one at Apple’s internet site. Doing this early on makes the setup procedure at the computer easier.
Open up the container and plug inside the MacBook. It will deliver with enough battery life to get commenced, but it’s nonetheless an excellent concept to fee up the battery to 100%.
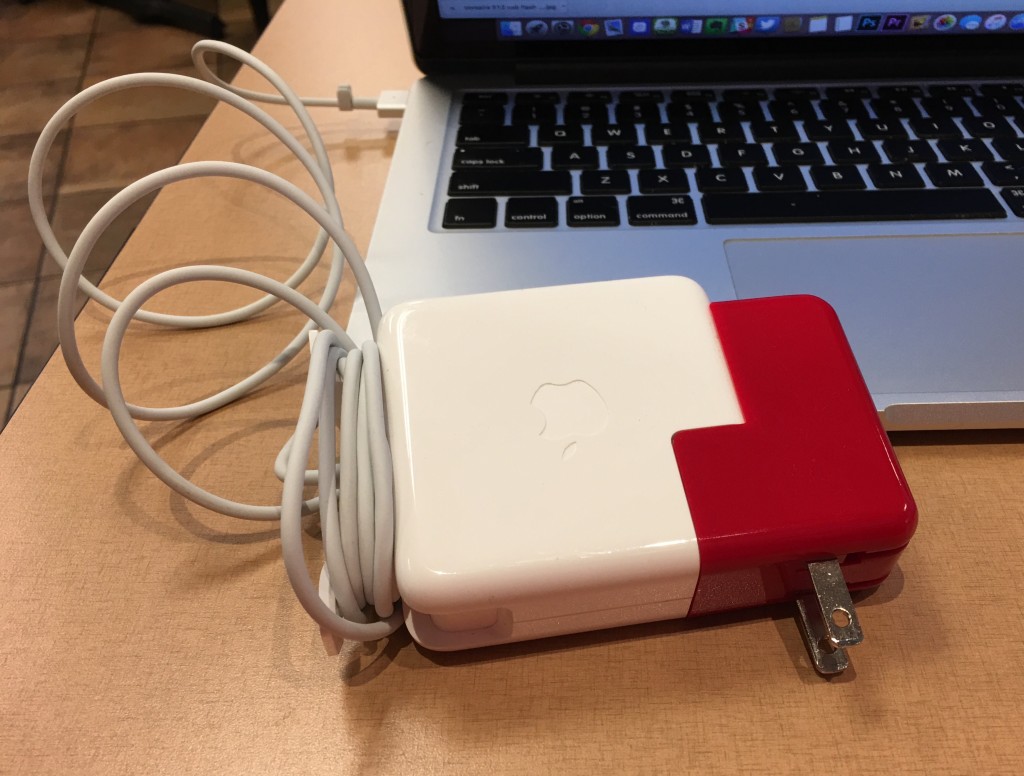
This is a MacBook Pro charger with a $45 Twelvesouth PlugBug on it rather than the AC connector that comes in the MacBook’s box.
Attach the charger magnetically to the left facet of the MacBook. The charger comes with an extension cable that plugs into the wall, however customers also can plug the rectangular white brick with rounded corners immediately into the wall with out the white rubber extension cord. You’ll have to attach the included AC adapter into the brick. Attach the wire if you assume you’ll need the extra period or depart it off if you don’t need the more duration. The new 2015 MacBook with Retina show doesn’t encompass this extension cable any more, however the MacBook Air and Pro still do.
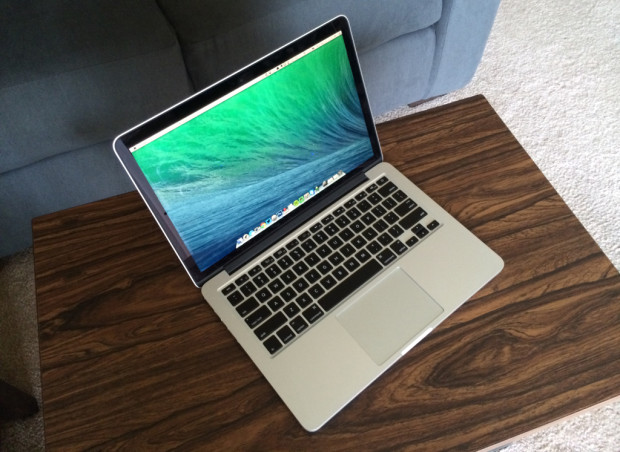
Your MacBook will appearance loads like the one in the unboxing video underneath displaying the 2013 model.
Booting the New MacBook for the First Time
Open the lid and press the strength button at the upper right corner of the keyboard.
The first time the laptop starts offevolved, it's going to ask a chain of questions. First, tell the operating gadget what u . S . A . You’re in. Then choose the language you need to use on your keyboard. A window pops up presenting to connect to Wi-Fi. Select your community and upload the password, if the community has one.
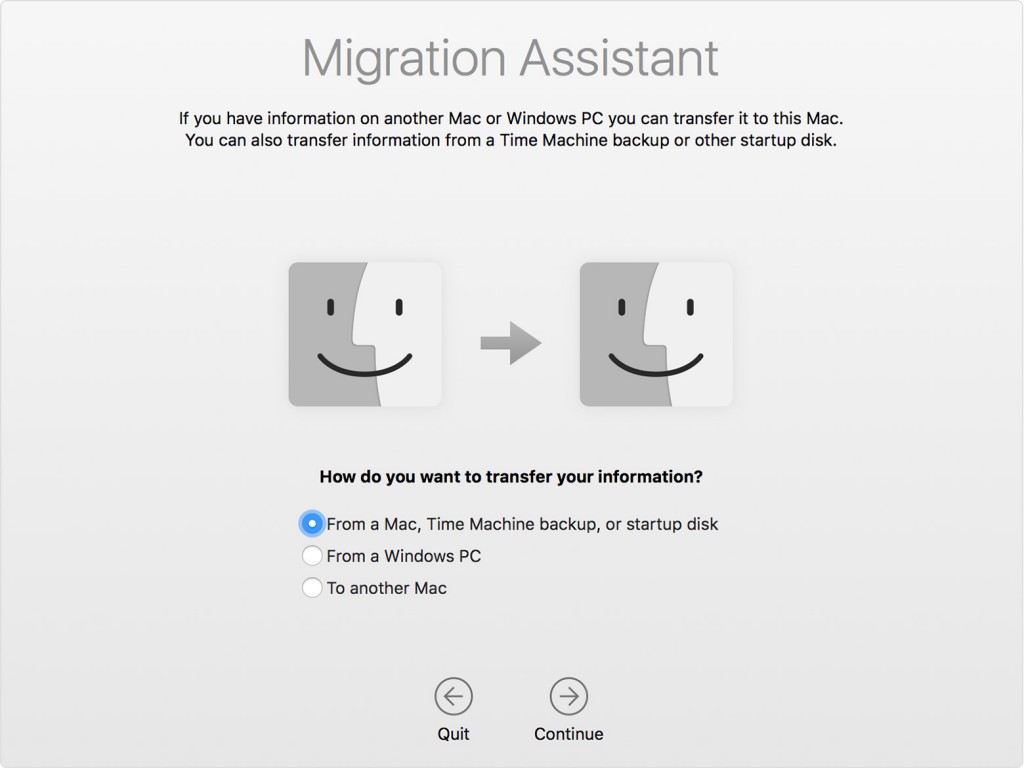
The MacBook will then ask to “Transfer Information to This Mac” and offers alternatives. Apple offers a entire manual for the use of the Migration Assistant to transfer records from some other Mac, a Time Machine backup, every other hard pressure or a PC. The 1/3 object seen above we could customers reproduction things to every other Mac. You gained’t see this on the MacBook the first time you boot. The above screenshot comes from the Migration Assistant app pre-set up in OS X within the Applications, Utilities folder. The one used within the first boot sequences is slightly exceptional, so the 0.33 item reads, “Don’t switch any information now.” Click on Continue to transport on after selecting the 0.33 item.
Why not switch documents now? It’s quicker to move files thru a USB flash force like the one recommended under in accessories. Also, starting with a clean device that doesn’t consist of all the junk we acquire through the years will permit the computer run smoother. Take the time to set the brand new MacBook up manually as an alternative. Copy your non-public files using some thing like iCloud Drive, a sync tool like DropBox or OneDrive, or the use of a USB difficult force or flash power.
The following couple of displays can help you …
- Enable locations offerings – turn this on in case you want to use such things as Find My Mac or let apps find you to discover contextual data related to where you're.
- Sign into iCloud. ICloud syncs files from different Apple gadgets like an iPhone, iPad, iPod Touch or different Macs. This additionally backs up key information like Photos, settings, and passwords.
- Turn on Find My Mac which helps you discover the MacBook if it receives lost or stolen. Go to iCloud.Com to discover it on a map.
- Agree to terms.
- Create a nearby person account or sign in the use of your Apple ID. I prefer the local user account and use my first name and an awesome password to guard my information. I also test the box that asks if I want to apply my Apple ID to reset the laptop’s password if I forget it.
- Choose to sign in the pc, which makes getting technical aid easier.
The Mac will finish the boot series after churning away to set matters up within the heritage. Wait patiently. It doesn’t take a long time to finish.
Check out the Apple OS X MacBook short start manual. It’s got quite a few recommendations and instructions for the use of El Capitan.
Sign Into Apple Accounts
Apple forces the user to signal into their Mac what looks as if 100 times. You’ll do it first at some stage in the boot procedure defined above. Open iTunes and the Mac App Store app and sign into both so that you can purchase media and apps.
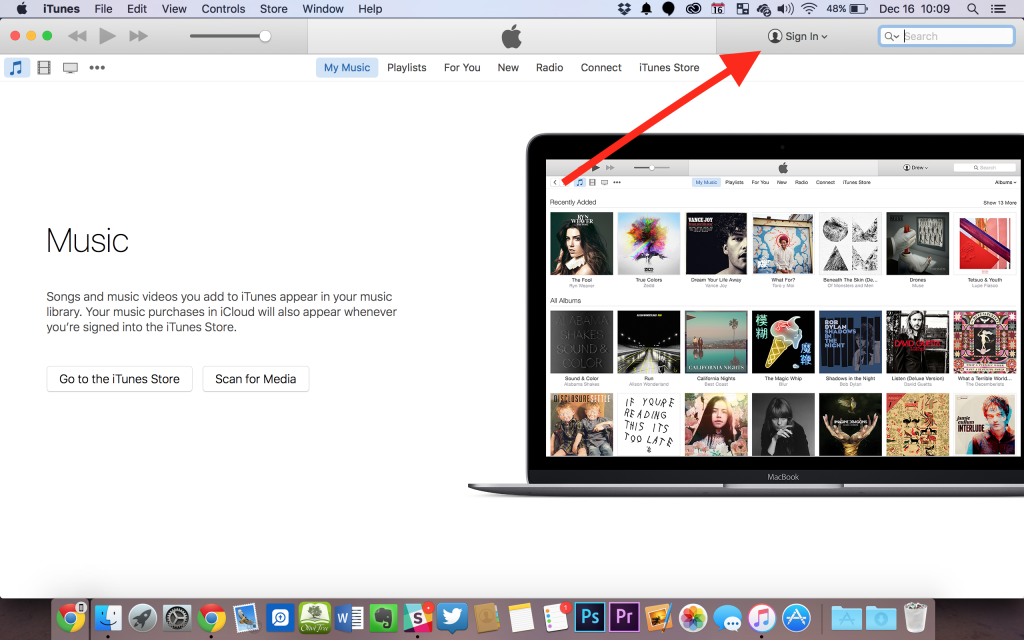
Sign into iTunes so that you can buy apps, track, movies and TV shows.
Open iTunes, icon at the Dock with musical notice on top of white heritage. Click at the Sign In button on the pinnacle right a part of this system. Enter the consumer name and password on your Apple account. If you share an iTunes account with a family member aside from your own Apple ID, you may upload that account instead of your account. Click OK while it finishes logging into iTunes.
The application will ask you to enter charge statistics. Add a credit score card or PayPal account so you can buy content. If you already added fee facts, just verify it. Apple will ask for your credit score card’s security code from the lower back of the card. Enter your call, address and make contact with range and take a look at accuracy. Click Done.
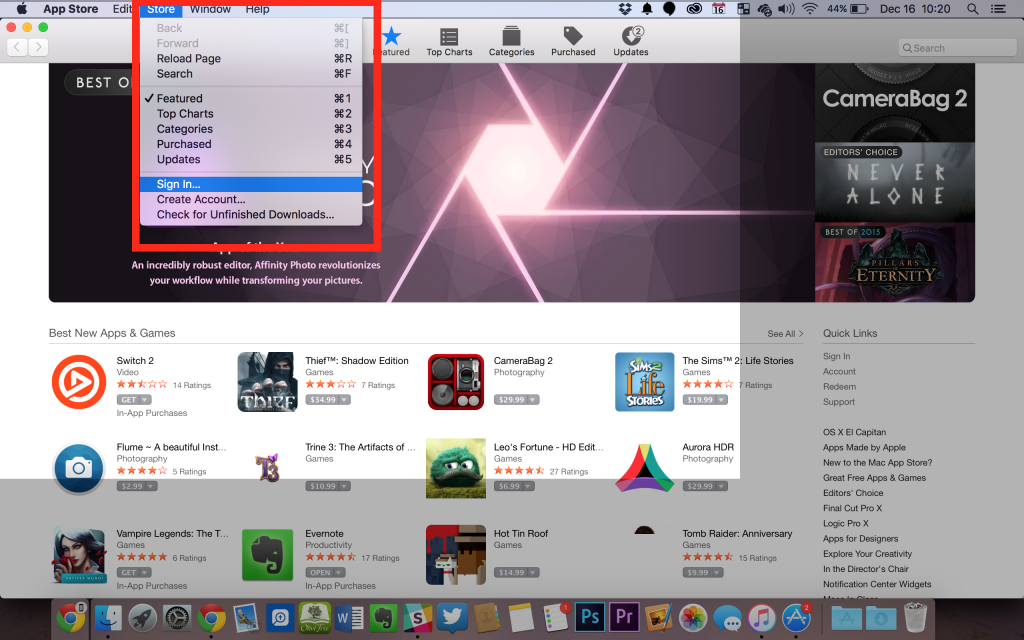
Open the Mac App Store and click on the Store menu. Select Sign In from the drop down menu. Add your Apple ID and the password and click Sign In. Now it’s geared up to down load apps.
While here, click on at the Updates tab at the proper end of the top toolbar. Let it look for updates and down load any updates to be had.
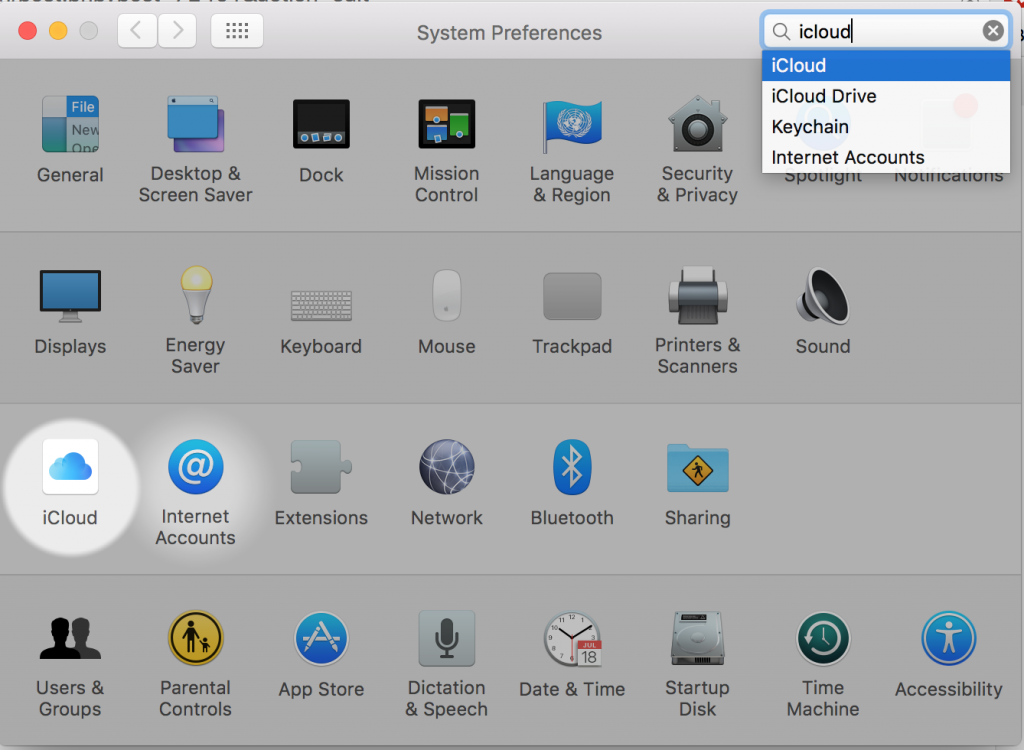
Open System Preferences from the Apple menu inside the upper left or from the Dock on the right cease and find iCloud in the 2d to final row on the left. If it doesn’t already display your iCloud account, which you may have entered at some point of the first boot, check in now. Check off the gadgets you want iCloud to sync.
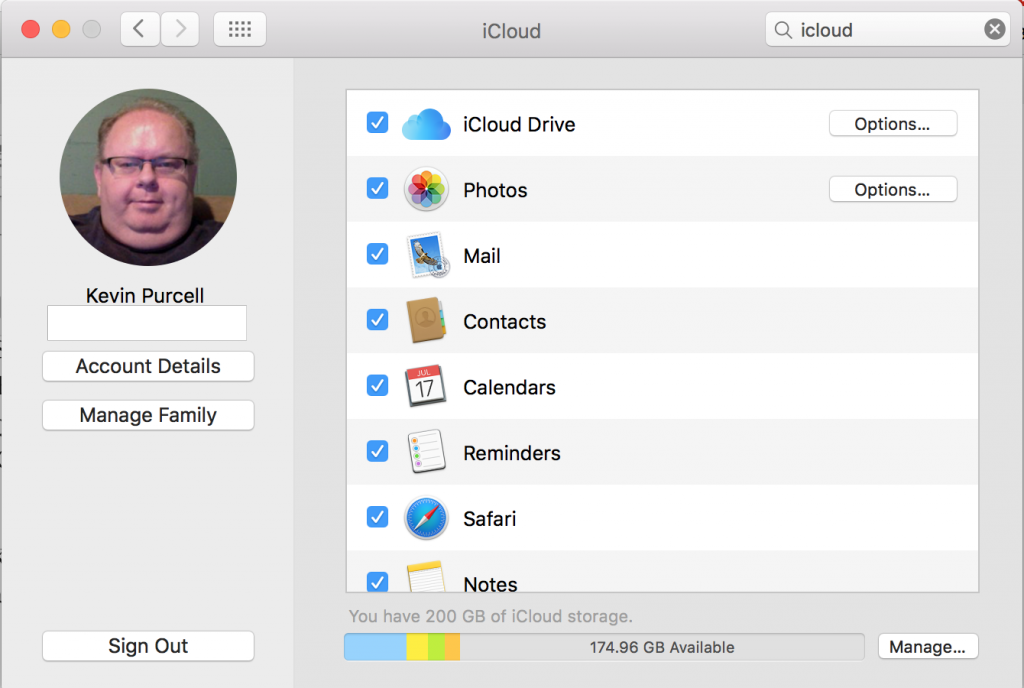
- iCloud Drive – syncs documents among Macs and iOS devices for apps like Pages, Keynote, Numbers, iMovie and others; the Options button lets you pick out which apps can use iCloud Drive.
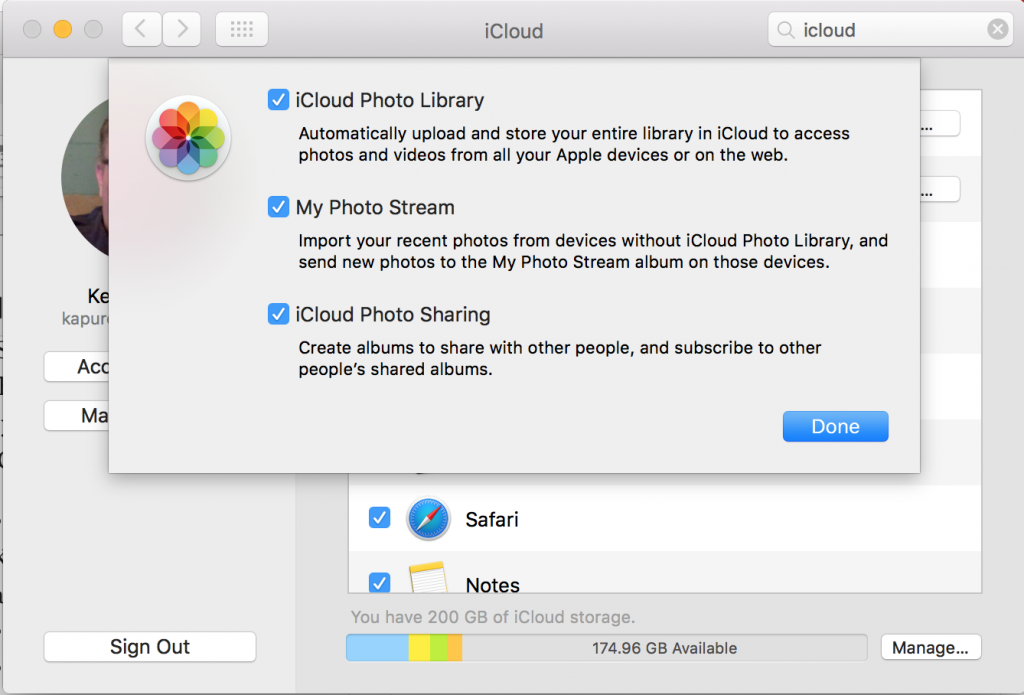
- Photos – syncs Photos on Macs and iOS devices. The Options button lets you pick alternatives for turning on or off Photos library and photograph movement and shared libraries (see beneath).
- Mail – syncs Mail debts and electronic mail from your iCloud mail account.
- Contacts – syncs Contacts in iCloud.
- Calendars – syncs Calendars in iCloud.
- Reminders – syncs Reminders lists and person Reminders.
- Safari – syncs settings, bookmarks and other browser content.
- Notes – syncs notes.
- Keychain – lets users sync things like settings and passwords; the Options button turns on approving Keychain sync the use of a protection code or a phone.
- Back to My Mac – lets you remotely control this pc from different Mac computer systems if it’s became on.
- Find My Mac – lets you locate your Mac on a map from iCloud.Com if this turned on.
Add Your Third-celebration Internet Accounts
While the System Preferences app remains open, add third-party debts. Click on Internet Accounts, the icon right of the iCloud icon. This shall we customers upload 1/3-celebration Internet accounts like Gmail, Yahoo and greater.
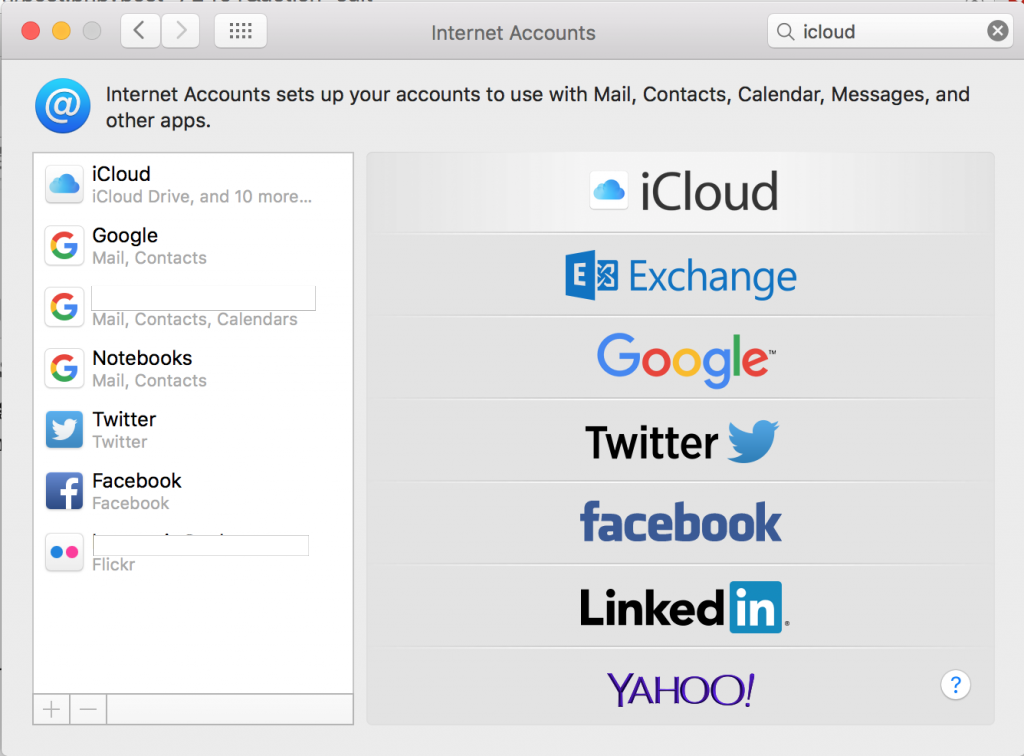
Add your Gmail, Yahoo, Facebook, Twitter or different 0.33-party Internet money owed here.
If you haven’t already, you could add iCloud here too. Most human beings will add such things as Gmail, Facebook, or Twitter here. The person needs their login statistics. Users who've a Microsoft Exchange account for paintings or college can add it right here too.
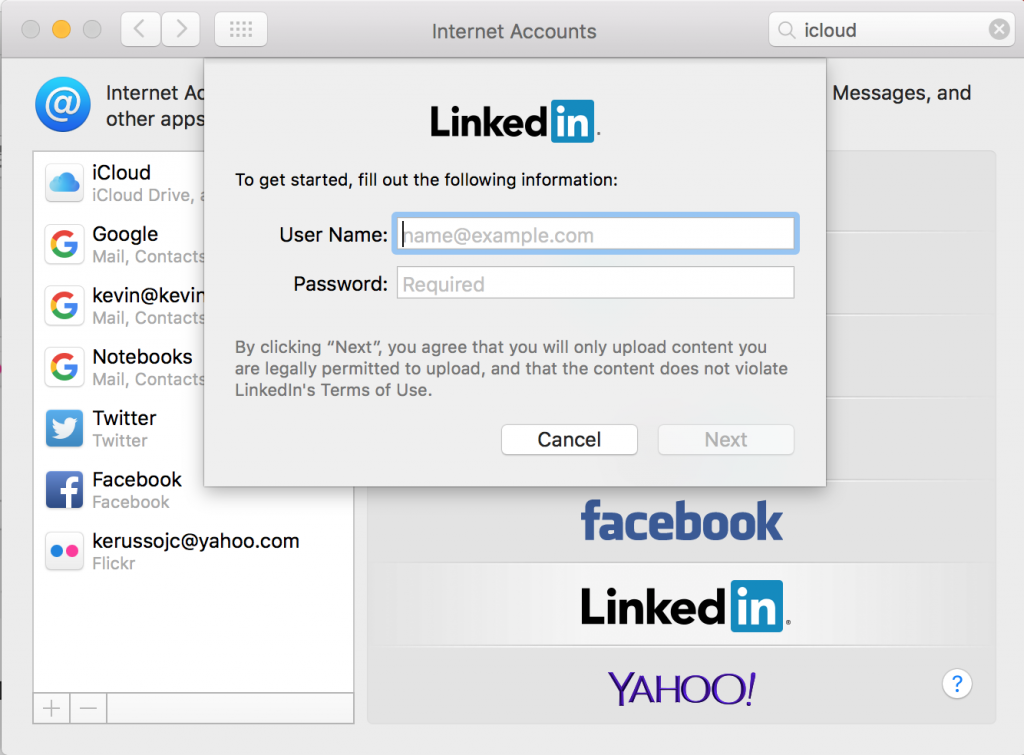
Click at the icon for the service you want to feature. Enter the user name and password for the account and click on Next. For a few of those, clicking the icon brings up a login web page from the provider. Yahoo does this. Add the person call or e-mail cope with and the password and sign up.
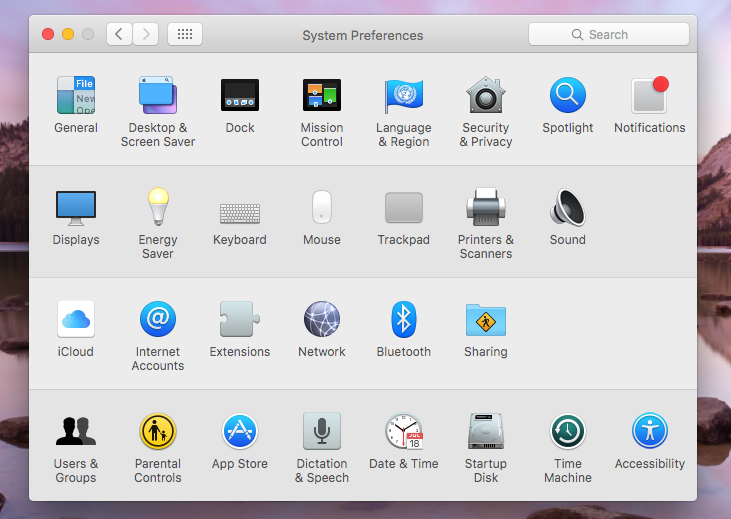
Change Key MacBook Settings in System Preferences
The System Preferences app houses all the primary device settings. Its icon looks like a black and grey equipment and sits within the dock. It’s additionally reachable from the Apple menu inside the upper left corner at the Menu Bar.
If you ever need to locate a selected setting however can’t don't forget where it is, enter the putting call in the Search field. In addition to the settings mentioned within the previous link, take a look at the following adjustments to make.
I normally begin with the pinnacle row of settings and open and set things as I decide upon. The General and Desktop & Screen Saver stay the identical on my structures considering I just like the default settings, however you can favor to open those to customise the appearance of OS X. I begin with the Dock settings.
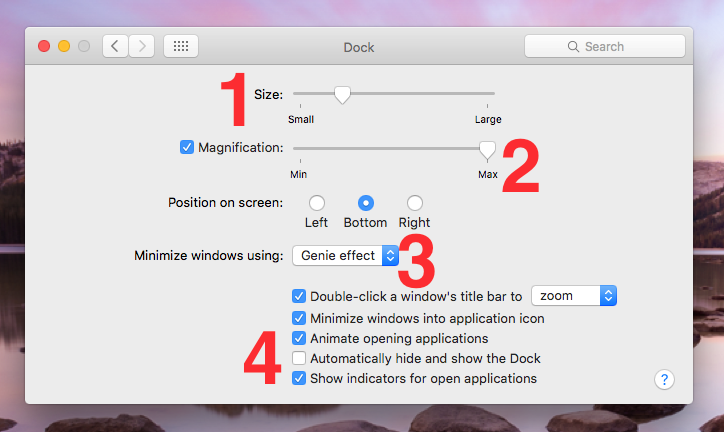
Here’s what I alternate:
- Shrink the Dock so that it takes up much less display screen area.
- Turn off or trade the Dock magnification settings. When the cursor hovers over the dock it will develop in size so the consumer can see the icon higher. This annoys numerous people so uncheck the check container if that describes you. People with poor eyesight like me as an alternative set this so the icons grow large.
- Change the position of the dock if you like. I decide on it along the lowest, however some need it at the left side or proper fringe of the screen.
- Change the five take a look at packing containers below the Dock position putting as you decide upon. One that many want to trade is the fourth item at the list. Check it to make the Dock leave until you hover over the bottom edge of the display screen with the mouse.
If your MacBook gets plugged in and left on in your bedroom or dorm room, open the Notifications placing and switch on the Do Not Disturb feature.
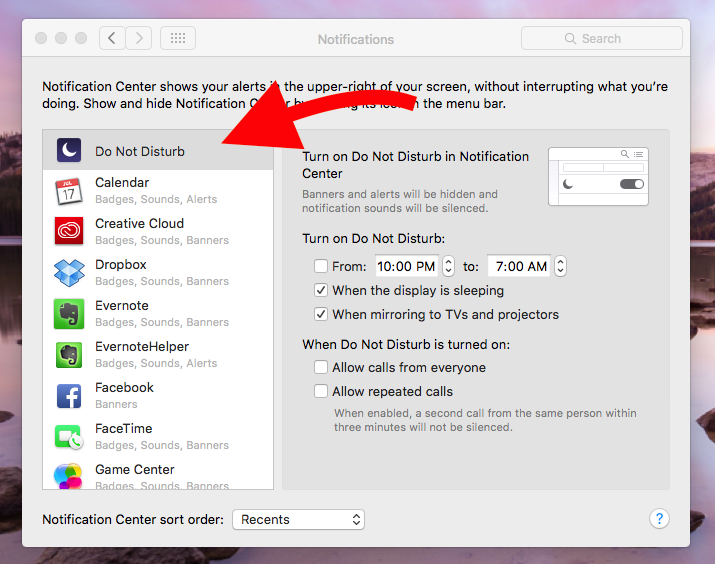
Users can set a time to show on/off Do Not Disturb routinely. This continues the computer from making noise or notifying the user about things like appointments. Also, the consumer can just flip it off when the display is in sleep mode or whilst the consumer mirrors the show to a TV or a projector, either via AirPlay and Apple TV or via the display output connections (HDMI or mini-Display).
The backside two gadgets permit for exceptions letting the 2 categories of notifications via even when Do Not Disturb is on.
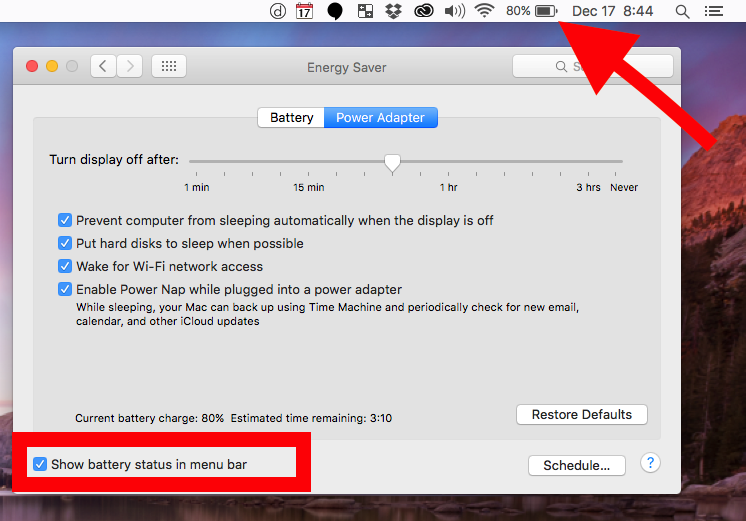
Next, open the Energy Saver setting. It organizes things into tabs, Battery and Power Adapter. Set the slider labelled Turn display off after: in each tab to your preferred stage. I don’t just like the default of 2 mins whilst strolling on battery, however some may additionally desire to depart it right here to get more battery lifestyles. I trade it to five minutes.
While plugged right into a Power Adapter, I set it to turn off the show after 1 hour, longer than the default. I do this due to the fact I most effective have the laptop open and plugged in once I’m making displays or want it to stay on.
Finally, I make certain that the Show battery fame in menu bar receives checked. This puts a battery life indicator inside the Menu Bar at the top of the screen. That’s the default, so leave it except you don’t need it displaying up on the Menu Bar.
I also like to save you the pc from going to sleep when the display is turned off while plugged in. I do this so that one piece of software program, which I deploy, carry out renovation overnight.
The Keyboard settings we could customers trade such things as Key Repeat, shortcuts and extra. Open the Setting and pick out the Keyboard tab first. Here’s what I change.
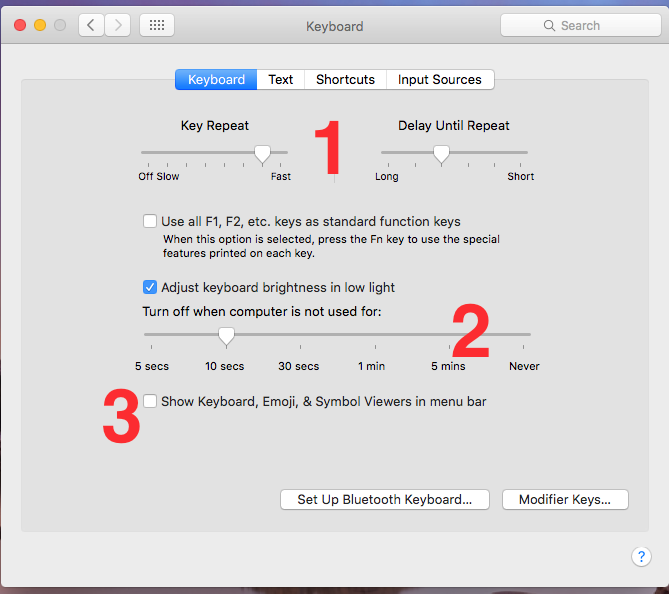
I increase the Key Repeat charge and the Delay Until Repeat. This makes the enter cursor paintings quicker once I press and maintain a key like the area bar to go into a bunch of spaces repeated.
Change the duration of time the keyboard backlight turns off. Increase it in case you don’t care about battery existence or lower it to get extra battery life.
Show Keyboard puts a keyboard icon in the Menu Bar if you need to trade between various keyboards, like from English to another language.
On the Text tab, I upload keyboard shortcuts for typically used textual content strings like my smartphone wide variety, cope with, e-mail addresses, and website addresses. Click on the plus icon below the list of textual content replacements. First, enter the shortcut in the field that suggests up inside the left hand column. For example, in case you’re including a shortcut on your electronic mail deal with, enter the first part of the e-mail. I positioned the first few letters of my email addresses. If the address is e mail@yoursite.Com then input some thing like email@. Then within the 2d container at the lowest of the proper side column enter the full e-mail deal with.
On the identical tab, a few human beings hate the automated replacements and turn this off by way of unchecking the field. If you try this, the replacement shortcuts you just set up will no longer paintings.
The other tabs will let you upload shortcuts in packages and add additional keyboard languages. I never change those.
Apple gives a ton of integrated keyboard shortcuts that will speed up your work. Learning these can assist customers emerge as greater talented in OS X.
In the Mouse and Trackpad settings pages, many human beings flip off Apple’s Natural Scrolling which scrolls backwards compared to the conventional manner of scrolling.
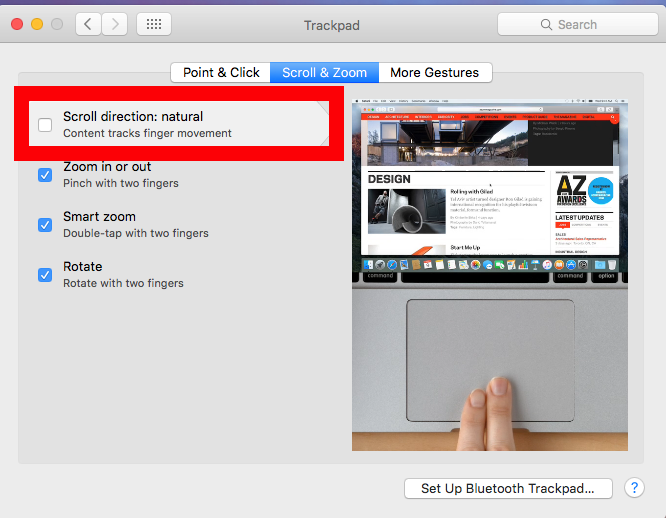
If you attempt scrolling and it feels like it’s going backwards, you'll need to exchange this setting. Open the Mouse or the Trackpad settings, whichever you’re using. Click on the middle tab labelled Scroll & Zoom. Uncheck or take a look at the Scroll path: herbal item on the top of the list of test packing containers. The lively GIF at the proper indicates how to use the Trackpad or Mouse the manner you've got it set.
Check out the opposite tabs and exchange matters as you pick in the ones locations.
If you personal a printer, open the Printers & Scanners setting to add your printer and exchange its settings. Use the plus icon to feature a brand new printer. If you plug within the printer’s USB cable, it should discover the software program and set up it. If it doesn’t, you’ll need to put in the printer/scanner drivers that came with it.
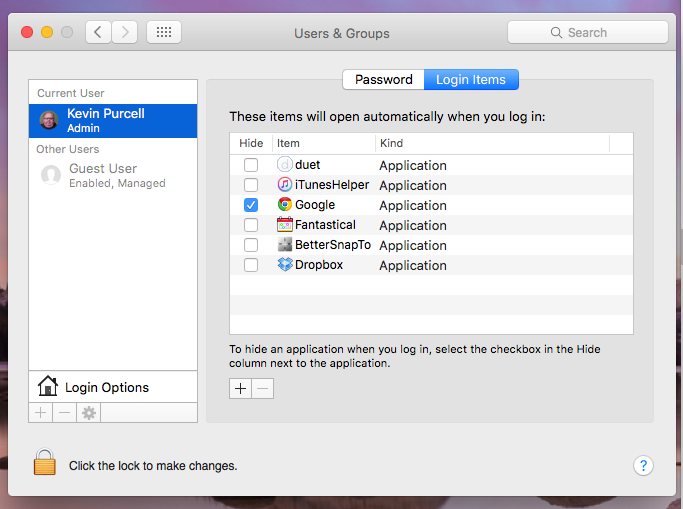
Next, open the Users & Groups placing. Find your user call setup throughout the first boot section above. Click on Login Items. This shows a listing of programs or apps with the intention to load mechanically each time you log into your consumer account. If you spot some thing you don’t want, choose it and click on at the minus button beneath the list container to do away with it. Unchecking the box simplest makes it load with out displaying your things like splash displays. This might speed up the laptop a chunk, if a bunch of these load. You won’t see that many things at the list until you begin putting in software program.
Do you want to stop OS X from installing app and operating system updates? Open the App Store placing and uncheck any of the gadgets in the listing you want to show off. For instance, some like getting notified of app updates, but don’t want them to download or to put in automatically.
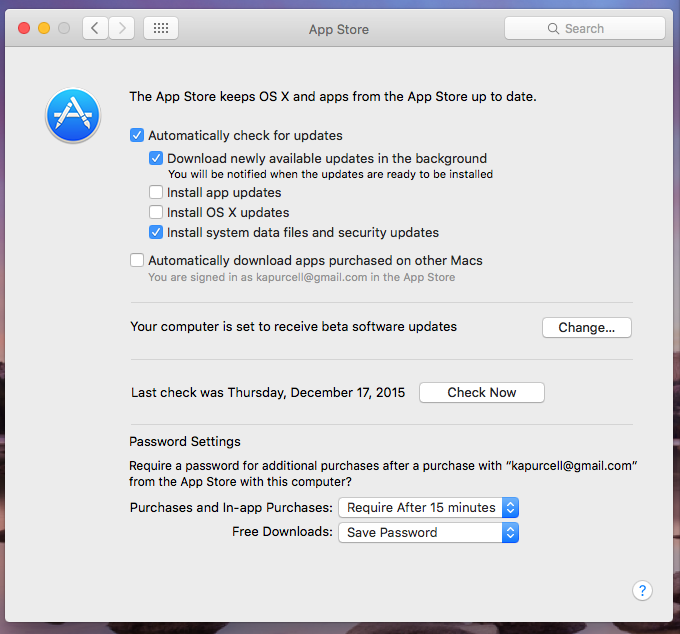
I like to robotically check for updates and have them download in the background, however I want to decide while to put in them. However, I need machine facts documents and security updates hooked up routinely so my system’s by no means prone to security troubles.
Don’t forget about to set up Time Machine. This backs up your MacBook every hour so that you in no way lose facts. It simplest works while you’re related to an outside tough pressure, so ensure to plug in periodically in your backup power.

Plug in the force after which open the Time Machine putting, if the running gadget doesn’t offer to open it for you. Turn Time Machine on (see #1 above) after which pick the force (#2) to back up the device to (if it didn’t open while you plugged on your new force). If you want get entry to to Time Machine, with out commencing System Preferences, then test the box (#three) at the bottom of the display to turn at the Menu Bar icon.
Get the Latest Software and OS Updates
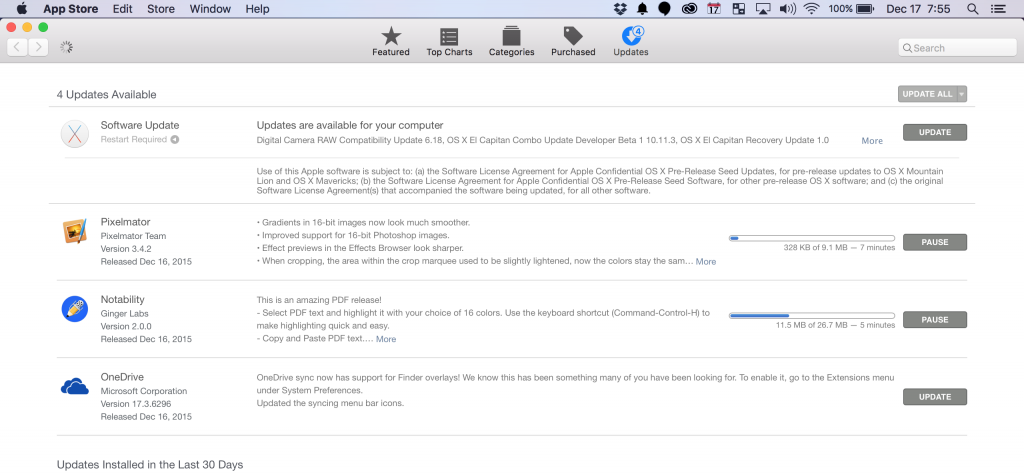 Open the App Store and click on on the Updates tab.
If you didn’t already get the ultra-modern versions of the operating machine and apps from the Mac App Store above, do so now. Open the Mac App Store and click on at the Updates tab on the proper end of the toolbar at pinnacle. Let it look for updates and down load them. If the computer includes an working machine replace, it'll ask to Download and Restart. Let it and go take a spoil until it finishes. This soak up to 30 minutes relying on how speedy your MacBook runs.
Other apps won’t ask to restart the system, but frequently the user will want to exit apps jogging inside the background. You in all likelihood received’t have a lot of those mounted at this early factor.
Grab Some MacBook Accessories
The first add-ons users need to keep in mind getting include a pleasing pc bag, a mouse, MacBook cowl, dongles and other useful gadgets. Here’s a listing to don't forget.

- MacBook computer bag – we adore WaterField Designs laptop luggage. My modern-day favorite is the Bolt Briefcase or the Staad Backpack.
- MacBook cowl – we really like the Moshi iGlaze for the MacBook Pro. Moshi contains other MacBook covers and instances too.
- Mouse – the MacBook glass trackpad is the best within the enterprise, but a few human beings nonetheless opt for a mouse. The Logitech Ultrathin Mouse (link indicates different cool add-ons too) is my favorite. It works a lot like the Apple Magic Mouse however is smaller.

- Dongles and Adapters – Apple loves dongles for a few reason. If you’ve were given a brand new MacBook with the Type-C USB connector, you’ll need dongles to connect with HDMI, regular USB, VGA, DVI or Ethernet.
- Twelvesouth PlugBug World – This adds a USB charger port in your MacBook charger. The MacBook charger comes with a detachable piece that holds the AC connector so users can swap out International connectors. Twelvesouth makes use of this layout to replacement their PlugBug that consists of a USB port.
- Backup Storage – We talked about setting up Time Machine above. A rapid outside difficult power will make this a better revel in. Look for a few things. If you may afford it, purchase an SSD that suits the MacBook’s storage size. If you have a 256GB power in your MacBook, then get as a minimum a 256Gb external force. If fee is the most vital thing, then clutch a large pressure just like the 1TB drive. They value $50-$75 for slower portable drives.

This Corsair 512 USB Flash Drive expenses over $300 but it'll let you back up your MacBook in a really transportable manner.
- Apple TV – The new Apple TV is a excellent streaming set-pinnacle container all by itself, however paired with a MacBook via AirPlay it becomes a 2nd show for doing displays or looking media saved to your Mac. You also can import the movies into iTunes and use the Apple TV’s characteristic that lets it circulate media from iTunes at the Mac. It also performs video games and we could customers set up different 1/3-birthday celebration apps.
Now it’s time to install your favored software and apps (see our list of 18 and our listing of 70 high-quality Mac apps). Then enjoy your new MacBook.